How to Use Cricut Maker 3? [Ultimate Guide]
Is crafting your passion? Cricut machines are the must-have gadgets at the top of the crafter’s Wishlist. With the new Cricut lineup, Cricut Maker 3, a crafter can find incredible features and better results. Once you learn how to use Cricut Maker 3, you can make anything you have in your mind. Moreover, the setup of this machine is quick and simple.
ALT Text:
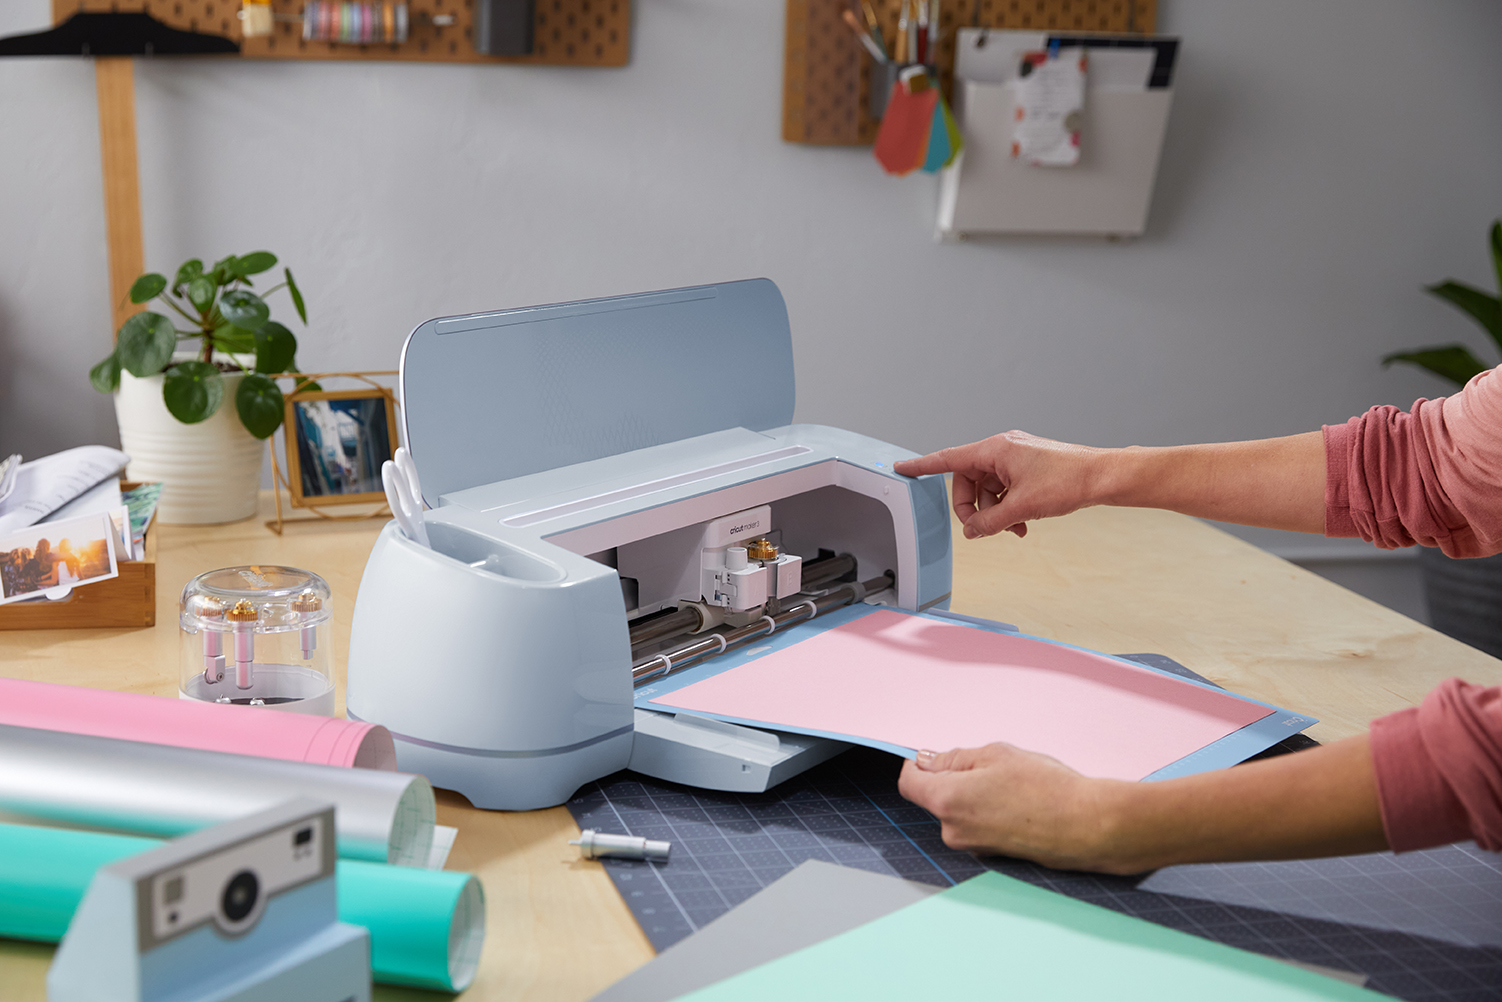
Making projects with the Cricut Maker 3 cutting machine

Last week, my friend
bought the machine from an online platform. He was excited to use it. But he
needed help to set it up. Luckily, I was at his home at that time and thus
helped him in unpacking and using the machine. I have been using this Cricut
machine for a long time. Earlier, I used to craft using the Cricut Maker, but
now, I am impressed with this Cricut Maker 3 machine.
Since I have been into
crafting for years and have used this machine extensively, I can help crafters
in setting up this machine. Here, I am going to explain almost everything you
require to get started with this machine.
What’s in the
Cricut Maker 3 Box?
The Cricut Maker 3 kit
comes with all the essentials to start crafting effortlessly. It comes with
great value to help crafters begin their projects. A crafter can discover more
accessories and materials included in the box. Let’s have a tour of this incredible
machine.
Here are several things
that come in the box of the Cricut Maker 3 machine. All these tools and
supplies will make your crafting journey time-saving and efficient. Therefore,
before you begin the Cricut Maker 3
setup, check them out.
● The machine itself, Cricut Maker 3
● Fine-point blade with blade housing installed in
the clamp.
● An accessory adapter (already installed in the
secondary clamp).
● A USB cables
● Power adaptor
● Quick start manual
● Sample materials and instructions on how to
perform a test cut.
These are some essential
things that you must check out before using the machine. Thus, while you unpack
the machine, make sure all the items are included in the kit.
The Process to
Use Cricut Maker 3 for the First Time
Are you excited about
making your first project with the Cricut Maker 3? This machine features
matless cutting, and thus, you will not require a mat for each project.
However, before you use this new machine, you are required to set it up. Below
are the steps on how to use Cricut Maker
3. Go through them and perform them carefully.
Step 1: Install
Cricut Maker First
If you are new to the
Maker 3 machine and want to set it up, install the machine first. Look for a
smooth and plain surface. This new Cricut machine is silent. Hence, you can set
it without any issue. Just make sure that you find a place where you can start
your first cut.
Step 2:
Complete the Firmware Update
After you place your
machine in a proper place, begin with updating the firmware. Please note this
step requires an active and stable internet connection. First, verify your
connection then connect your Maker 3 machine to the system. Use a USB cable for
this purpose. To update the firmware, follow these simple steps.
- Initially, move to the official site of Cricut.
- Next, you have to choose Download.
- Then, start installing Design Space on your system.
ALT Text:
Installing Cricut Design Space on a system.

- Perform all the on-screen prompts to complete the
installation.
- After that, move to the next steps of signing in to
the Design Space.
- Further, sign in using your Cricut ID or make a new one.
ALT Text:
You can either sign into the Design Space with your Cricut ID and password or
create a new one.

- After the machine setup finishes, Design Space will
identify your machine.
- In the later step, verify the firmware update.
- Click on Update
once you have the list of all available firmware.
- Finally, wait for some time to complete the update.
After the completion of
the update, the Cricut Maker 3 machine will restart. Click on Continue and start with your favorite
Cricut machine. Thus, if you are looking for how to use Cricut Maker 3 for beginners, you can find the above
steps helpful. Using the Cricut machine becomes effortless with the proper
how-to-use steps and tools.
Step 3: Select
the Right Tools and Supplies
Maker 3 machines come
with specific tools to start crafting. There are separate blades to cut
delicate and hard materials, respectively. So, when you start with the process,
pick the one based on your materials and the project type. Like, if you need to
draw something, choose a Cricut pen, whereas, select Cricut blades for cutting
the project.
Note: You
can use other accessories, apart from Cricut Maker 3 accessories, while you use
Maker 3 for your project.
Step 4: Get
Started with Your First Cut
Did you select the right
materials or tools? The next step is to load the Cricut cutting mat into the
machine. Make sure to remove the mat cover, load it into the machine, insert
the material, and adjust the material properly. Finally, load the mat and material
into your Cricut. The machine will then cut your material based on the given
directions.
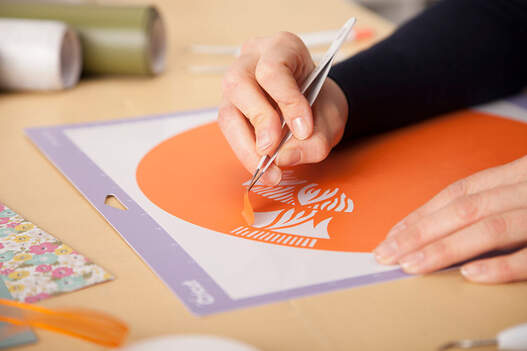
Step 5: Take
off the Excess Material
ALT Text: Use a weeding tool to take off the excess material from your final cut.

Do you need to learn how to use Cricut Maker 3 after your
cutting? After doing the cut, you
can find the final cut needs to be polished. You can see leftovers on the final
cut. Here, the best idea is to use a weeding tool to take off the excess
material. Alternatively, you can use your hands to ward off the unwanted extra
material.
Step 6: Get
Ready with Your First Cricut Project
After weeding out the
material, you can begin with your first Cricut project. You can use Vinyl
material with your Cricut machine. Make sure to cut the vinyl according to the
shape, size, and design you expect. If you want to know the Maker 3 setup, you can
carry along with the above six steps. It will make your crafting journey
convenient.
Conclusion
The Cricut Maker 3 comes
with high-quality features and double cutting speeds compared to the previous
model. With the function to cut Smart materials, this machine allows crafters
to go matless during crafting. This machine is faster than the original Maker
machine. Thus, once you learn how to use
Cricut Maker 3, you can start
creating whatever you want. Crafting with this machine is joyous, and
therefore, you can begin the process with your sister, mother, or your friends.
Frequently
Asked Questions
What Can a
Cricut Maker 3 Machine Do?
The Maker 3 machine
comes with a unique and expansive tool system that works with 13 different
crafting tools. With this, the machine gives crafters the freedom to cut,
write, engrave, deboss, and do a lot more. The adaptive tool system helps in
controlling the direction and pressure of the blade to match the users’
materials. It cuts more than 300 hundred different materials.
How to Setup
Cricut Maker Machine?
If you don’t know how to use Cricut Maker 3, go through the below-mentioned points.
It will help you in setting up the machine properly.
- Firstly, connect your machine and computer using a
USB cable/Bluetooth.
- Next, download Design Space.
- Select Smart
Cutting Machine from the New
Machine Setup window.
- Finally, follow all the on-screen prompts.
How to Connect
a Cricut Maker to a Windows Computer?
You can connect your
Maker machine to a Windows computer using some simple steps. Here are the quick
steps for the process.
- Go to the Start
menu on a Windows computer.
- In the next
step, select Settings.
- Then, open Devices.
- Next, turn on Bluetooth
and click on Add Bluetooth or
another device.
- At last, choose Bluetooth
then your Cricut machine.


Comments
Post a Comment